About Ximpia
Overview
Ximpia allows you to model back-end and front-end in an easy way to minimize lines of code for your application.
On the front-end, you parametrize javascript components in HTML5 and define stylesheets to customize look and feel.
On the back-end, you define your services (=use cases) with views, actions and app flow and other services like search, settings, parameters, already defined so you can speed up development.
Views
Views are called from menu items, search or other action components like buttons, links, etc...
They query your database and display information to your users, so framework uses slave databases for them. For example, they would be list of customers, search customers and customer detail.
Views must all have a form which is defined in the decorator. Forms hold fields as well as window success messages and error messages.
In case you need to link views in a flow, you would set views into the workflow. You don’t need to write code for this, all flow logic is kept parametrized into the Workflow. You may write variables into the workflow and then define flows for views and actions depending on variable data. Your services may write into workflow as well. It is easy to write wizards, use cases that link to other use cases in a business operational flow.
@view(forms.HomeForm)
def viewHome(self):
        db_setting = self._instances('ximpia.xpsite.data.SettingDAO')[0]
        # your code...
We have HomeForm with messages and fields for home view.
You would need to register the view, template, menu items and search for each view. In case you don’t map views with menu, you can skip menu registering:
self._reg.registerView(__name__, serviceName='Users', viewName='login', slug='login',
                                                className=SiteService, method='view_login')
self._reg.registerTemplate(__name__, viewName='login', name='passwordReminder', winType='popup',
                                        alias='password_reminder')
self._reg.registerSearch(__name__, text='Login', viewName='login')
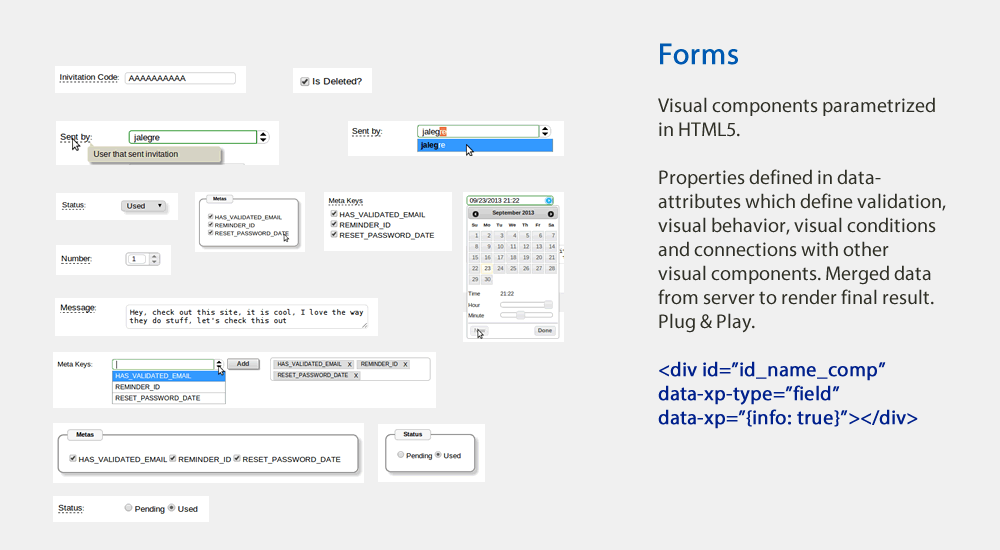
Forms
Ximpia forms are a bit different from django forms since they keep database fields inyected into fields.
class LoginForm(XBaseForm):
        _XP_FORM_ID = 'login'
        _dbUser = User()
        username = UserField(_dbUser, 'username', label='XimpiaId', required=False,
                jsRequired=True, initial='')
        password = PasswordField(_dbUser, 'password', minLength=6, required=False,
                jsRequired=True, initial='')
        socialId = HiddenField()
        socialToken = HiddenField()
        authSource = HiddenField(initial=K.PASSWORD)
        choices = HiddenField(initial=_jsf.encodeDict({'authSources': Choices.SOCIAL_NETS}))
        errorMessages = HiddenField(initial=_jsf.buildMsgArray([_m, ['ERR_wrong_password']]))
        okMessages = HiddenField(initial=_jsf.buildMsgArray([_m, []]))
We need _XP_FORM_ID to have an unique id used in front-end. Your forms in a service should have an unique id. When we build form data for front-end, we use field attributes from model like maxlength, labels and helptext. You can customize these attributes in the form class as well.
Actions
Visual components associated with actions like buttons and links will call your actions. They may be called from search and menu items as well.
Action operations may be mapped to your services. Each action would have an implementation associated with it in a method.
@validation()
def _authen_user(self):
        if self._f()['authSource'] == K.FACEBOOK and self._f()['socialId'] != '':
                self._ctx.user = self._authenticate_user_soc_net(self._f()['socialId'],
                        self._f()['socialToken'], self._f()['authSource'], 'facebook',
                        _m.ERR_wrong_password)
        else:
                self._ctx.user = self._authenticate_user(self._f()['username'],
                        self._f()['password'], 'password', _m.ERR_wrong_password)

@action(forms.LoginForm)
def login(self):
        """
        Performs the login action. Puts workflow parameter username, write context variables
        userChannel and session.
        """
        self._authen_user()
        self._login()
        user_channel_name = self._get_user_channel_name()
        self._dbUserChannel = UserChannelDAO(self._ctx_min)
        self._ctx.userChannel = self._dbUserChannel.get(user=self._ctx.user,
                name=user_channel_name)
        self._ctx.session['userChannel'] = self._ctx.userChannel
You need to map form associated with the action using action decorator. Form is validated prior to processing action in decorator logic.
You can implement validation operations that need to be checked in order to execute your actions. You call them inside your action method (like self._authen_user()). You can think of this as service-level validaations or business validations.
You would register them like:
self._reg.registerAction(__name__, serviceName='Users', actionName='login', slug='login',
        className=SiteService, method='login')
Templates and Visual Components
Ximpia templates are plain HTML5 files. You will find them at:
myproject/myapp/templates
You will find your app directory with window and popup directories.
You will also find blank templates at your project path, built by ximpia ximpia-app script. You would copy those blank templates and rename them in order to start with your own templates.
Here goes an example for change password popup:
<!DOCTYPE html>
<html>
<head>
<meta http-equiv="Content-Type" content="text/html; charset=utf-8" />
<title>Ximpia - Change Password</title>
</head>
<body>
<div id="id_popup"
                data-xp="{title: 'Change Password'}" ></div>
<!-- Content -->
<section id="id_content" class="sectionContent">
<div id="id_changePassword">
<form id="form_userChangePassword" action="" method="post" data-xp="{}">
<!-- ximpiaId -->
<div id="id_username_comp"
                data-xp-type="field"
                data-xp="{tabindex: '1', label: 'XimpiaId', 'readonly': 'readonly'}" > </div>
<!-- password -->
<div id="id_password_comp" data-xp-type="field"  style="margin-top: 10px"
                data-xp="{type: 'password', info: true}" ></div>
<!-- newPassword -->
<div id="id_newPassword_comp" data-xp-type="field" style="margin-top: 10px"
                data-xp="{type: 'password', info: true, class: 'passwordStrength'}" ></div>
<!-- newPasswordConfirm -->
<div id="id_newPasswordConfirm_comp" data-xp-type="field" style="margin-top: 10px"
                data-xp="{type: 'password', info: true}" ></div>
</form>
</div>
<br/>
</section>
<!-- Content -->
<!-- Page Button Bar -->
<section id="id_sectionButton" class="sectionButton">
<div id="id_popupButton" class="btBar">
<div id="id_doChangePassword_comp" data-xp-type="button"
                                data-xp="{      form: 'form_userChangePassword',
                                                        align: 'right',
                                                        text: 'Save',
                                                        type: 'iconPopup',
                                                        mode: 'actionMsg',
                                                        action: 'changePassword',
                                                        clickStatus: 'disable',
                                                        icon: 'save'}" ></div>
</div>
</section>
<!-- Page Button Bar -->
</body>
</html>
div elements with _comp ending in id hold the visual components. These visual components will be parsed by our js rendering engine, build html5 and mix server data with visual data.
Visuals for your application are built using what we call visual components. They are jQuery plugins that mix server data with parametrized data in HTML5 templates.
We provide a set of visual components tailored for most needs and you only need to parametrize them in HTML5 templates. Most of the time, you will not need to develop js code, simply configure the components with HTML5 data- attributes.
You can link your visual components and apply style themes.
In case this is not enough for you, you can write your own components.
Example for list component:
<div id="id_groups_comp" data-xp-type="list.data" style="margin-left: 10px"
        data-xp="{      app: 'ximpia.xpsite',
                dbClass: 'GroupDAO',
                disablePaging: true,
                fields: [       'id',
                                        'group__name',
                                        'category__name',
                                        'groupNameId',
                                        'parent',
                                        'isPublic',
                                        'isDeleted',
                                        'dateCreate',
                                        'dateModify',
                                        'userCreateId']
        }" > </div>
Will render as tabular data:
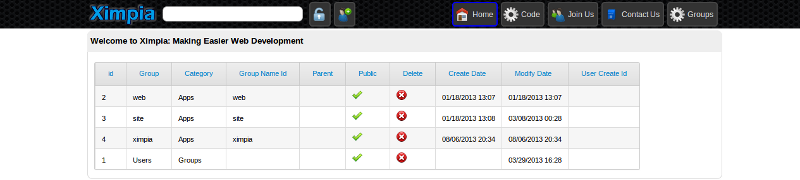
You have many components to choose from: